Ancient beauty methods have come back into fashion this year, loved for their age-old wisdom and popular for their jaw-dropping results. When it comes to hair care, you've probably already heard of The Rice Water Method. If you haven't, you're in for a treat.
Influencers, Bloggers and TikTokers alike have been raving about The Rice Water Method, posting astounding before and after pictures of astronomical hair growth. After hearing all the buzz surrounding this method, I had to try it, and this ancient beauty trick blew my socks off.
What is the Rice Water Method?
The Rice Water Method does what it says on the tin; you simply rinse your hair with water that has been used to soak rice for several days. Once your hair is saturated with the rice water, you pop on a shower cap and let the water work its magic for 20 minutes. Then, you rinse your hair again. That's it!
The reason why this method has become so famous is because of the tribe of women who practise it. The Yao women of Huang Luo in China, who are credited with starting this ancient method, are famous for their long, strong and shiny hair. After reading their story I was inspired. Who wouldn’t want hair like theirs?! (Give them a quick google to be seriously wowed).
What are the benefits of the Rice Water Method?
Rice contains proteins that are believed to strengthen hair. When applied to the scalp, these proteins are believed to stimulate growth. When applied to the weak or brittle ends of the hair, these proteins are thought to reinforce and strengthen the hair fibres. That's why many hair products that help to promote growth are infused with this magical ingredient.
Rice water is a concoction you can make from home by following this method. Filled with nutrients, vitamins and antioxidants, the rice water should, theoretically, contribute to healthier hair. Reviews across the internet claim their hair has grown faster, feels healthier, and looks shinier. Although this method is yet to be scientifically backed, for many beauty gurus, the proof is in the pudding. That was definitely the case for me.
The best products infused with Rice Protein:My results
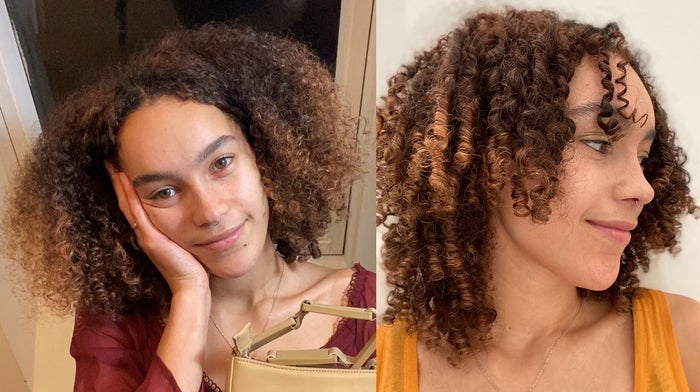
These pictures were taken just two weeks apart. I couldn't believe the difference I noticed in the quality of my hair. As you can see in the first photo on the left, my hair is normally quite dry and frizzy, curly but lacking in definition. In the second picture, my curls are defined and even a little bit shiny. I'd never had shiny hair in my life! My hair feels stronger and softer to the touch and my dry ends have disappeared.
Although the method can be a bit of a faff, it's absolutely worth it. During lockdown, I've had more time to practise self-care, and I'm so glad I invested my time in this method. Since seeing my friends and family again, they've all commented on how much longer and stronger my hair looks.
How do you do the Rice Water Method?
Step 1: Place rice in a container and add water
You can use any kind of rice you like, they all work. However, I would recommend Jasmine for the light scent. You can use any container with a lid, like a large jar. Personally, I used a protein shaker bottle that was lying around. Once the water and rice are mixed, give the rice a little stir before attaching the lid.
Top Tip: Put an orange peel in the container with your rice. That'll stop it from smelling.Step 2: Ferment rice in the fridge
You can use the rice after just 30 minutes of fermenting, but I like to wait for 2-3 days. That way, the water will have absorbed plenty of the rice’s protein. When you look inside, the water should look viscous and slightly shiny. That’s when you know it’s done. Decant the liquid into a spray bottle, ready for application.
Step 3: Shampoo
Before you go anywhere near the rice water, you need to wash your hair. The rice water fits in at the end of your routine, working similarly to a mask. For this reason, the rinse needs to be applied to freshly washed and detangled hair.
If you're looking to lengthen your locks, I would recommend choosing a shampoo that is free from both sulphates and alcohols. Sulphates can be too strong for your delicate curls and alcohols dry out the hair. When combined, these two ingredients can limit the growth you experience or the length you retain.
The Umberto Giannini Curl Jelly Wash Shampoo is my favourite sulphate-free shampoo. Crafted sustainably, this formula is carbon neutral, making it good for your hair and the planet. Despite being sulphate-free, this shampoo still lathers, which is a must-have for me.
10 best sulphate-free shampoos for curly hair
Discover the best sulphate-free shampoos for curly girls and guys.
Step 4: Condition
When conditioning and detangling, make sure you are as careful as you can be. Your hair may look like it's not growing, when actually, it's struggling to retain length. The ends are the most prone to breakage, and added to that, the fibres are their most vulnerable when wet. These two factors make it very easy to snap or break off your ends during the conditioning and detangling process. If loads of hair is left in your brush after you finish detangling - that means you've probably not been careful enough.
To stop this from happening, take the time to section your hair and detangle with your fingers before using a comb or brush. Personally, I like to use a comb, as it forces me to be more careful. Split your hair into four sections, treating one area at a time. Honestly, it's worth taking the extra time, I've experienced far more growth since practising this method.
Step 5: Rinse hair
After shampooing, conditioning and detangling your hair, you can go in with the rice rinse. If you want to know more about my styling routine, check out our Curly Girl Method Guide. Starting with the ends and moving upwards, spray the rice water onto clean hair. Once you have covered all your hair, open the spray bottle and tip the remaining rice water over your scalp.
Step 6: Let it sit for 20 minutes
Once your hair has stopped continuously dripping (a little bit of dripping is fine – you don’t want to lose all that sacred rice water), put your wet hair up in a shower cap. I’d recommend having the shower cap next to you before you start the rinse. That way you don’t have to walk around your home with sopping wet hair. You can also place a towel around your neck to absorb any excess water.
Keep your wet hair in the shower cap for up to 20 minutes, but not any longer. If you leave it on for too long, you can overload your strands with protein.
Step 7: Rinse again
Now your 20 minutes is up, rinse your hair again with clean water. Make sure you are very thorough, especially on the scalp, to avoid irritation. Once that is done, dry your hair with a microfibre towel or t-shirt, and continue with your usual styling routine. You’ll notice that your hair feels softer and absorbs your curl creams better – you’re welcome.
After something else? SHOP ALL HAIRCARE to find the perfect product for your hair type.