How to nail the perfect at home manicure
Lock down or not, learning how to do your own nails properly is a life skill that every girl should have up her sleeve for when they can't get to the salon. We have put together a full how-to guide for achieving a salon worthy manicure in the comfort of your own home. Not only is it beneficial to polish up your skills, but a little at home pamper is a relaxing way to fill your extra spare time, de-stress and also gives you a sense of accomplishment. Read on for a step-by-step guide of how to get the same glossy set of nails that you once thought only your trusty technician was capable of creating.
Step 1: Clean & Soak
To create the perfect flawless polish, you need to start with a completely blank canvas. Make sure that all previous nail polish has been removed so that the nails are clear, clean and ready for your new look. Stay sustainable and make sure that you can keep up your regular nail care by using re-usable pads to take off your previous polish. Clear off any excess dirt from the nail by washing your hands thoroughly with a luxurious hand soap such as the Molton Brown Fiery Pink Pepper Fine Liquid Hand Wash and then soak them in some warm water to soften the nail and cuticles to prep them for shaping.

£9.17
Step 2: Moisturise
After soaking and washing, it's important to moisturise the hands to lock in hydration and keep the skin smooth and soft. For a full pamper experience take the time to make sure that the hand cream is applied properly, massaging each individual finger and pressure points on the palm. If you have the time, and your hands are in need of a little extra TLC due to washing more frequently recently, after cleansing, apply a nourishing mask such as the BeautyPro Hand Therapy Collagen Infused Glove to both hands, leave on for 20 minutes then wash off with warm water. Follow with an intensely hydrating hand moisturiser for your softest skin ever.

£10.00

£6.00
Step 3: Smooth & Shape
Whilst the nails are still soft from their soak, use a clipper and/or nail file to trim your nails into your desired shape and length. Use the nail file at a downward angle to avoid rough edges at the tips. Using a buffer, buff the top of the nail gently to smooth out any rough surfaces and create an even surface for your polish to be applied onto easily.

£32.00

£2.40
Step 4: Cuticles
For cute nails, push back your cuticles! Use a wooden cuticle tip, or cuticle remover if you have it, to gently push back the unwanted surface and elongate the nails for a clear base to add polish to. This is also best done post-soak when the cuticles are at their softest and can be moved and shaped easiest. Unless you really know what you're doing, don't worry about trimming your cuticles like you may have seen your technician do. As the area is very delicate, you risk cutting yourself (which means no more manicure), and may also remove too much; the cuticles are key for protecting the nail beds from bacteria so don't completely get rid of them!

£18.00
Step 5: Base
A solid manicure is built on a solid base. To create the foundation of strong and healthy nails, apply a base coat all over the nail. Not only does this make the nail less likely to chip, but also protects it from staining, especially if you are applying a darker colour in your next step. Start in the middle of the nail and move the brush towards the edges, making sure that you're getting right down to your perfectly pushed back cuticles to cover the whole surface.
If you are applying a gel base, apply the polish sparingly across the nail and make sure to clean any polish on the skin around your nails before curing them under your UV light for the time specified on your lamp instructions.

£19.00

Recommended Retail Price: £13.50Current price: £8.10

£23.00
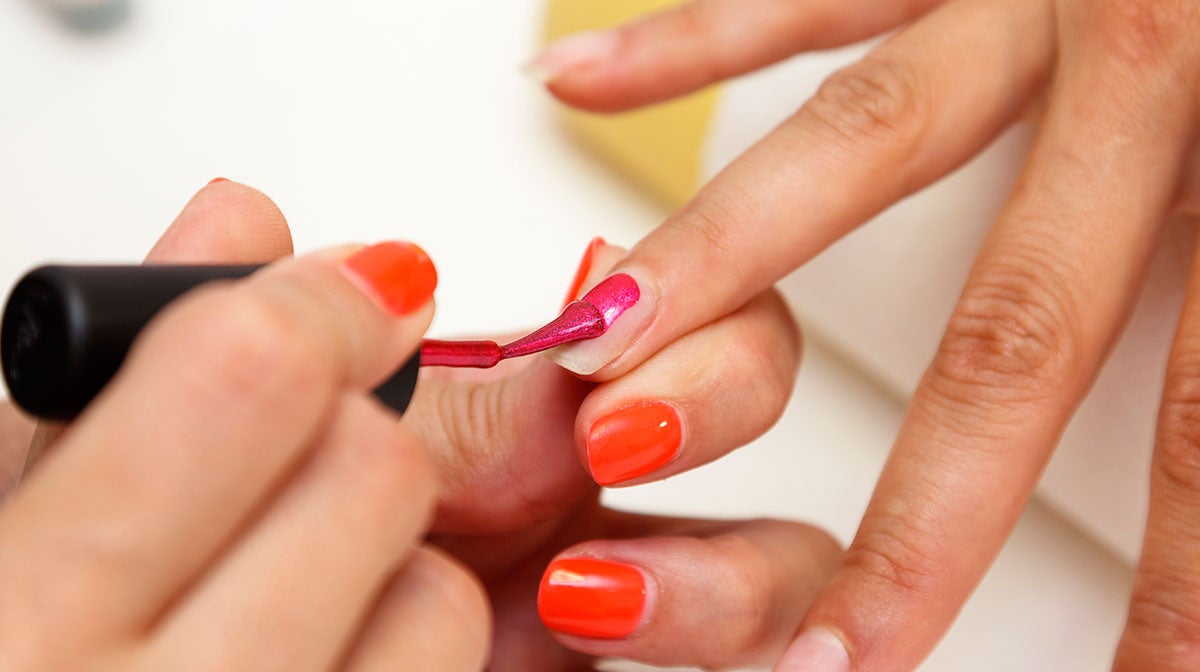
Step 6: Colour
Again, starting in the middle of the nail and smoothly stroking outwards, add your chosen colour. When it comes to adding polish, the fewer strokes the better, as lightweight layers are less likely to chip or smudge. Build up to your desired intensity of colour with thin layers of each coat, letting each one dry properly before applying the next. Unless you're one of the few lucky people that are completely ambidextrous, you'll have a non-dominant hand. To steady yourself, make sure that your elbows are rested on the table and use a towel or block to prop your elbow up slightly. If you do get some around the edges, don't worry, this can be easily cleaned up (see step 8).
For gels, the same as with the base applies; cure each layer individually and make sure to clean up your edges before putting your hands under the light as the UV heats up the gel and can damage the skin.

Step 7: Top Coat
The devil is in the detail with a good manicure, so never skip the top coat! Not only does this protect all of your carefully applied colour, it adds that salon quality shine to make your nails look glossy and brighter. Give the top coat extra time to dry before moving on to the next step to ensure that everything is locked down and won't chip or smudge, ruining all your efforts so far.
For your gel manicure, allow a little extra curing time for your top coat to make sure that all layers are completely set before you move on to the next steps.

Recommended Retail Price: £16.00Current price: £8.00

£19.00

£9.99
Step 8: Tidy
If you don't have the steadiest of hands and notice that you've not quite managed to stay within the lines, no problem. Use a cotton wool swab or cuticle stick with nail varnish remover to go around the edges of the nail and clean up any unwanted over-spill.
If you're using gels, you will have already cleaned up any patches on the fingers before drying. To make sure that the nails are clean and smooth, using a purifying nail cleanser, gently wipe the top of the nail to get rid of any sticky residue.
Step 9: Oil
As mentioned before, cuticles are important to the health of the nail! Look after them by applying a nourishing cuticle oil that will moisturise and keep the beds strong and healthy. For a touch of added moisture, and to leave the hands super smooth and soft, repeat step 2 (any excuse for another hand massage!).

£15.00

Step 10: Admire
Sit back and admire your beautiful full set of glossy nails in awe (adds nail technician to CV).
Shop the full range of nail care and polish on lookfantastic here.

Working with brands at LOOKFANTASTIC for over two years I have developed my knowledge of all things beauty from key skincare concerns to niche makeup tricks and haircare hacks. I have a major passion for finding effective solutions that are easily accessible to everyone so that we can all achieve our best, glowing complexion.